This is how I reset a WordPress website using this complete guide that is actively maintained. It covers a complete set of steps taken for preparations beforehand, applying the reset, and restoring by sections for a much cleaner site. Also, it covers how to completely remove the reset plugin and its excess objects and data left behind. This is part of my “Website Maintenance and Support” category.
Phase 1. Preparing For A WP Site Reset
This phase is to give you a lot of backups of settings, files, and notes along the way. The reason it’s a bit lengthy is because you’re not going to later perform a full restore from a site backup. You’ll empty it and add it back with cleaner, leaner methods.
Perform a full site backup
Even though you won’t be doing a full site restore, this full site backup is a major precaution to have available if you discover you can’t fully reimport all sections of your site for any reason.

- Option 1: Use site’s backup plugin WPvivid.
- Ensure manual backup quantities to retain are at least set to 6.
- Option 2: Use cPanel or WHM account backup.
- Remember, this is like a server’s domain backup. But, it also includes any subdomains too so, ensure no edits to any add-on domains are done during this entire backup and WP Resetting process.
- Save backups to secondary location.
- Save to cloud storage or download and save locally. That’s because if you need to roll it back using a restore, you’ll potentially lose prior backups from the local host server.
Save Important Settings
Saving individual sets of settings is how you’ll be able to later reimport your site in sections to keep it cleaner and leaner than before. Also, your plugins might be different or the same as a free version. Regardless, this will give you the idea behind saving available settings of each of your plugins. These are the ones I currently use.
Save Comment Settings
- From WP Admin, go to Settings | Discussion.
- Under “Disallowed Comment Keys”, copy list and paste into a new text file named “Disallowed Comment Keys.txt”.
Save Theme Settings
Your theme might be different (like Kadence, Divi, or Generate Press) but this will give you a good idea of what to save on your theme. For Nexter Theme, from WP Admin, go to “Nexter Settings | Theme Builder”. Then, select a template and tap to <Export Template>. Repeat with each one you intend to keep. I use this area for my heading and footer templates.
Also, this theme export example is actually a unique feature in the AIOSEO plugin, if you use that SEO plugin.

Save Plugins’ Settings
- 301 Redirects Pro (aka WP 301 Redirects): From WP Admin, go to Settings | 301 Redirects.
- Under tab “Settings”, go to inner tab “Tools”. In “Export” section, tap <Download Export File>.
- Admin and Site Enhancements Pro (ASE Pro): From WP Admin, go to Tools | Enhancements.
- On bottom right side of any screen, tap “Export | Import” URL. In “Export Settings” section, tap <Export ASE Settings>.
- Code Snippets Pro: From WP Admin, go to Snippets (not Code Snippets) | All Snippets.
- Under the tab “All Snippets”, select all of them. Then, in the “Bulk actions dropdown, select “Export”. Tap <Apply> to download the file.
- Important: Take notes of which snippets were enabled as “Active”. The reimport process doesn’t activate anything so you’ll need to know which ones to reactivate, if some of them were inactive.
- Database Cleaner Pro: There is no backup of any settings nor assignments of any previous unknowns.
- Go Live Update Urls PRO: There are no backups of any settings but they are minimal, if any.
- GreenShift Plugins: The only GreenShift plugins settings are the ones used in the GreenShift Theme, already referenced earlier. So, nothing else to export.
- Independent Analytics Pro: From WP Admin, go to Analytics | Settings.
- For Reports: Scroll down near the bottom to the section “Export Report Settings”. Tap to “Select all reports” and unselect the default reports shown here. That’s because reimporting will duplicate the preexisting default reports.
- Default reports for Pages to unselect: Posts, Today, Pages Yesterday, Pages Last 7 Days, Pages Last 30 Days, Pages All Time, Top Landing Pages, Fastest Growing Pages.
- Default reports for Geographic to unselect: Cities, European Countries, Geographic Last 30 Days, Geographic All Time.
- Default reports for Campaigns to unselect: (none)
- Default reports for Referrers to unselect: Search Engine Traffic, Social Media Traffic, Fastest-Growing Referrers, Last 7 Days, Referrers Last 60 Days.
- Default report for Devices to unselect: Browsers, OS, Devices Last 7 Days, Devices Last 30 Days, Devices Last 90 Days.
- Default report for Clicks to unselect: PDFs, Zips, Emails, Phone numbers.
- For Data: Scroll down near the bottom to the section “Export Data to CSV”. Tap each button to export its particular set of data.
- For Settings: There is no backup of settings.
- For Reports: Scroll down near the bottom to the section “Export Report Settings”. Tap to “Select all reports” and unselect the default reports shown here. That’s because reimporting will duplicate the preexisting default reports.
- Redis Object Cache: There are no settings.
- WordPress Importer: There are no settings.
- WP Force SSL Pro: There is no backup available of any settings.
Export Content: Pages, Posts, Images
- WPvivid Backup Plugins Pro: From WP Admin, go to menu item “WPvivid Plugin” | Settings.
- Scroll down to the section “Export/Import settings” and tap <Export>.
Save WordPress Items
- Pages
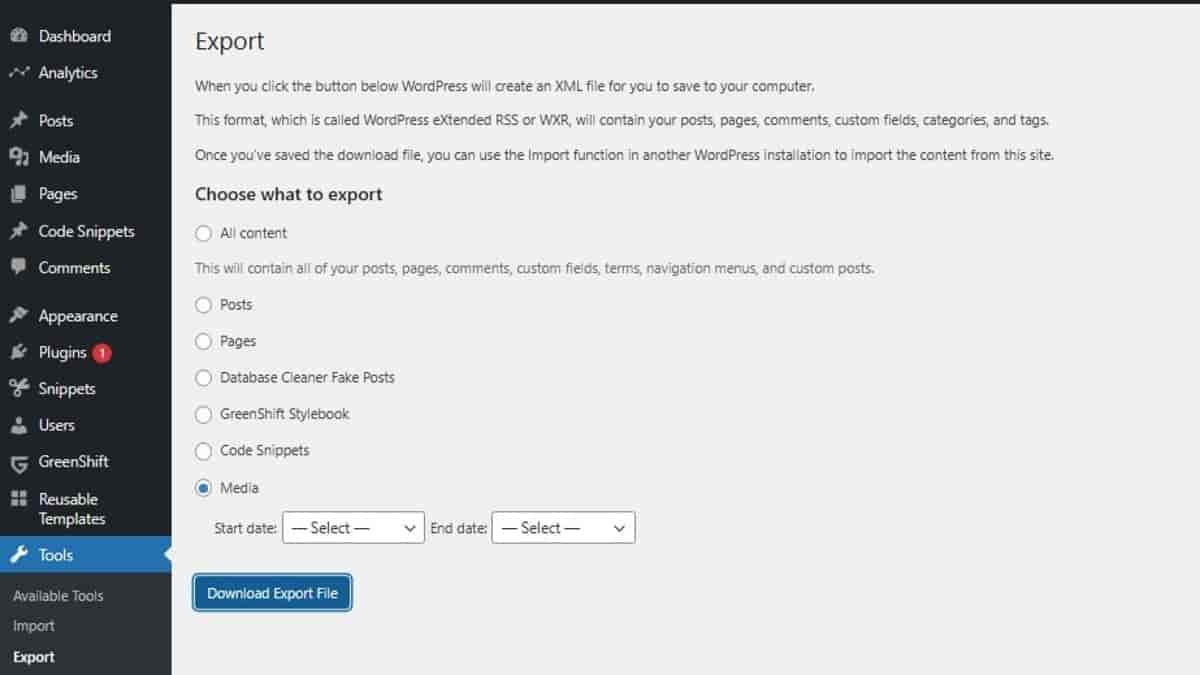
- Option 1: From WP Admin, go to menu item “Tools” | Export. Select option “Pages” (no other revealed optional filters) and tap <Download Export File>. This does not save images.
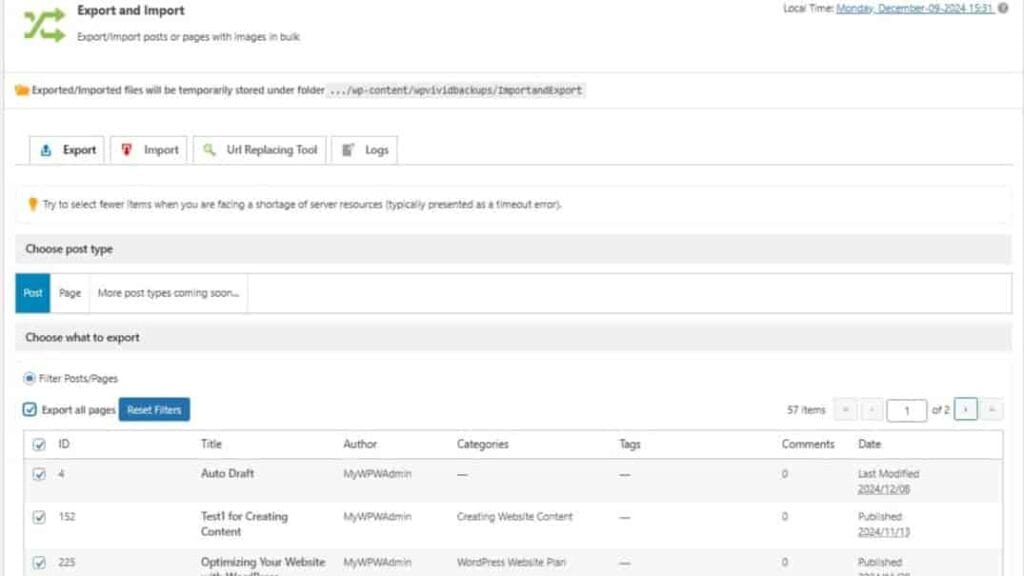
- Option 2: From WP Admin, go to menu item “WPvivid Plugin” | Export/Import Page. Then, from the tab named “Export”, select “Page” from “Choose post type”. Then, tap <Next Step> and follow the rest of the wizard. This option saves the images and taxonomies.

- Option 3: Install Zippy plugin temporarily and use it to “Archive” (export) pages or posts. However, there’s an undefined limit to how many at one time so, limit each to about 20 selected items to archive/export.
- Posts
- Option 1: From WP Admin, go to menu item “Tools” | Export. Select option “Posts” (don’t select any other revealed optional filters) and tap <Download Export File>. This option does not save images. It only saves “pointers” to an image ID, if the image (with its ID) exists in the library.
- Option 2: From WP Admin, go to menu item “WPvivd Plugin” | Export/Import Page. Then, from the tab named “Export”, select “Post” from “Choose post type”. Then, tap <Next Step> and follow the rest of the wizard. This option also saves the images and taxonomies.
- Media
- Ensure you’ve retained all media locally. If you don’t have that, go to your site’s folder location and download them:
- public_html | wp-content | uploads
- Option 1: From WP Admin, go to menu item “Tools” | Export. Select option “Pages” (don’t select any other reveals optional filters) and tap <Download Export File>. This does not save images; it only saves the data records that associates an image ID with its correspond post ID, page ID, etc.
- Option 2: You can us cPanel’s File Manager. Go to the sites folder root public_html folder | content | uploads. Then, download its contents. Some of the other folders might contain other content. Note: During restoration, some import processes will include media for posts and pages (as specified). However, there are some basic items like site logo and icon that won’t appear so, having this extra set of the Media Library will at least give you the images available to manually add back in.
- Option 3: When you save posts and pages using WPvivid backup plugin, the related images are automatically included.
- Option 4: When you backup an entire site using WPvivid backup plugin, it contains individual folder backups for uploaded images. So, it’s good to have this for other media that doesn’t store with individual objects like posts or pages. Examples are site icon, site logo, and individual images that you might use for other aspects like for views.
- Ensure you’ve retained all media locally. If you don’t have that, go to your site’s folder location and download them:
- Views (or Content Views): From WP Admin, go to menu item “Tools” | Export. Select option “Views” and tap <Download Export File>. This item is only available if you have a plugin that adds this option, e.g., the “Content Views” plugin.

Phase 2. Performing a WP Site Reset
- Install plugin “WP Reset Pro”.
- Activate and run the onboarding process but optionally select to NOT install recovery script.
- When ready, tap on tab “Support”. Then, save the recovery password and the URL that leads to the recovery script.
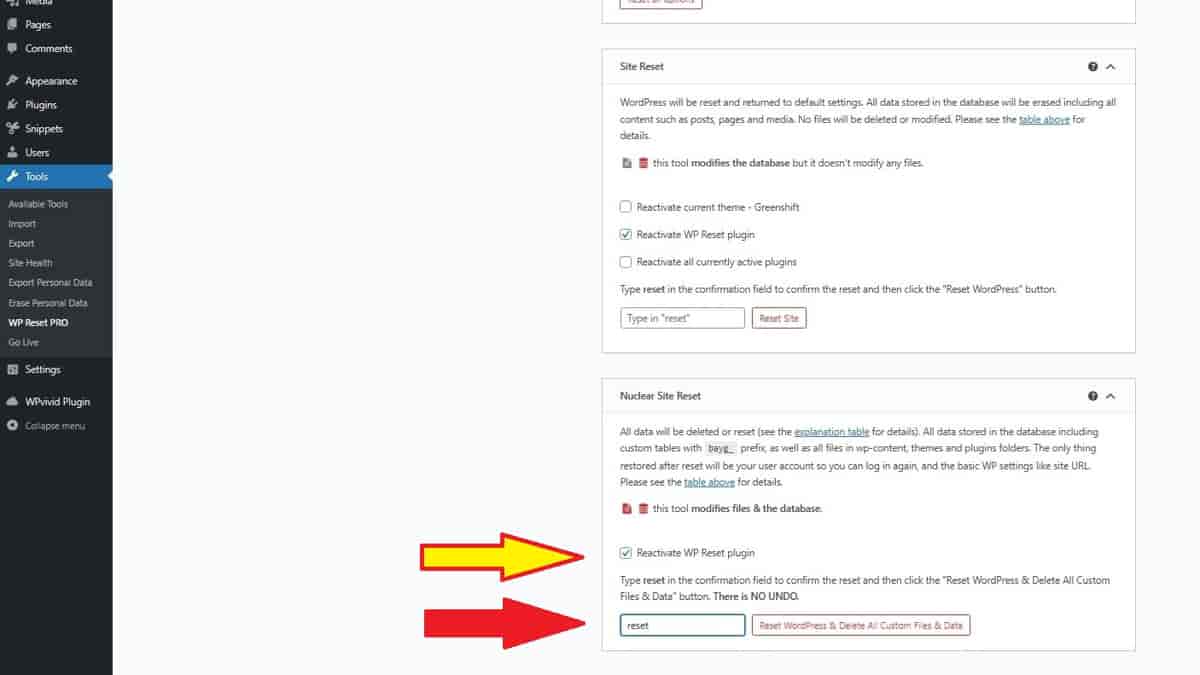
- Under the tab “Reset”, scroll down to bottom section named “Nuclear Site Reset”. Leave option selected to reactivate “WP Reset” plugin. Then, if you’re certain you have a full site backup, proceed with the Nuclear Site Reset.
- Notice there’s nothing that will appear for the site homepage URL at this time. It will be blank but there shouldn’t be any errors revealed.
- After the nuclear reset, follow the steps in the file named “Before removing WP Reset Plugin.txt”. Then, deactivate & delete the WP Reset plugin.